[TOC]
本章目标
- nginx反向代理负载均衡
- 分布式会话管理
- 使用redis实现分布式会话存储
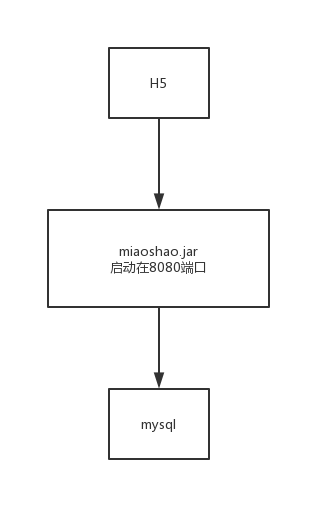
单机部署结构:
#nginx反向代理负载均衡
单机容量问题,水平扩展
表象:单机cpu使用率增高,memory占用增加,网络带宽使用增加
cpu us:用户空间的cpu使用情况(用户层代码)
cpu sy:内核空间的cpu使用情况(系统调用)
load average:1,5,15分钟load平均值,跟着核数系数(比如2核cpu,这个数字在2以下就是正常的),0代表通常,1代表打满,1+代表等待阻塞
memory:free空闲内存,used使用内存
水平扩展方案
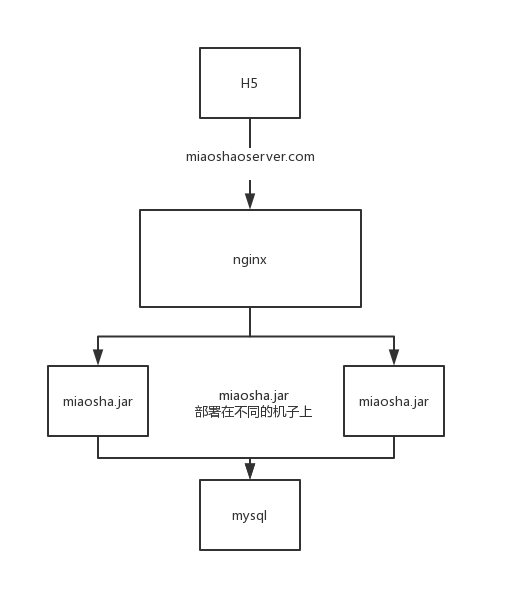
我们需要4台服务器来完成上述的水平扩展,1台用于nginx,1台用户mysql,2台用于部署miaosha.jar(java Application)
mysql数据库开放远端连接
默认情况下,mysql帐号不允许从远程登陆,只能在localhost登录。
添加用户权限
- 如果你想root使用123456(密码)从任何主机连接到mysql服务器的话。
mysql>GRANT ALL PRIVILEGES ON *.* TO 'root'@'%' IDENTIFIED BY '123456' WITH GRANT OPTION;*.*:所有的databases和所有的表
‘root’@’%’:用户名为root的用户,%:所有的host
IDENTIFIED BY ‘123456’:但是必须知道密码:123456
- 使修改生效,就可以了
mysql>FLUSH PRIVILEGES;服务端水平对称部署
在2台服务器上分别部署miaosha.jar
验证访问
http://202.117.35.220:8080/item/get?id=6
和
http://202.117.35.221:8080/item/get?id=6
是否访问正常
nginx反向代理
部署图:

nginx主要有3种功能:
使用nginx做为web服务器
使用nginx作为动静分离服务器
使用nginx作为反向代理服务器
修改前端资源
在htmlStable目录下添加gethost.js
var g_host = "localhost:8090";在对应的前端代码也改了
如getotp.html中的
head标签中添加gethost.js
<head>
<meta charset="UTF-8">
<link href="static/assets/global/plugins/bootstrap/css/bootstrap.min.css" rel="stylesheet" type="text/css"/>
<link href="static/assets/global/css/components.css" rel="stylesheet" type="text/css"/>
<link href="static/assets/admin/pages/css/login.css" rel="stylesheet" type="text/css"/>
<script src="static/assets/global/plugins/jquery-1.11.0.min.js" type="text/javascript"></script>
<script src="./gethost.js" type="text/javascript"></script>

</head>
ajax请求:
$.ajax({
                type:"POST",
                contentType:"application/x-www-form-urlencoded",
                url:"http://"+g_host+"/user/getotp",
                data:{
                    "telphone":$("#telphone").val(),
                },
安装openResty
- 解压:
tar -xvzf openresty-1.13.6.2.tar.gz- 由于是源码下载的方式,进行配置编译
#编译bash脚本
./configure
直接进行步骤2,会直接报错
ERROR: failed to run command: make install TARGET_STRIP=@: CCDEBUG=-g XCFLAGS='-DLUAJIT_ENABLE_LUA52COMPAT -msse4.2' CC=cc PREFIX=/usr/local/openresty/luajit DESTDIR=/Users/xuxinghua/java/项目/秒杀/Java电商秒杀系统深度优化 从容应对亿级流量挑战/工具包/openresty-1.13.6.2/build/luajit-root/在第二步前,安装前准备
apt-get install libpcre3-dev \
    libssl-dev perl make build-essential curl
然后
cd openresty-1.13.6.2/
./configure- 安装openResty
使用下面的命令来编译
make如果您的电脑支持多核 make 工作的特性, 您可以这样编译:
make -j2假设您是的机器是双核。
make install
如果前面的步骤都没有问题的话,您可以使用下面的命令安装 OpenResty 到您的系统中:
make install使用nginx做为web服务器
- location节点path:指定url映射key
- location节点内容:root指定location path后对应的根路径,index指定默认的访问页
- ==sbin/nginx -c conf/nginx.conf启动==
- ==修改配置后直接sbin/nginx -s reload无缝重启==
linux启动nginx
sbin/nginx -c conf/nginx.conf查看nignx进程
ps -ef|grep nginx查看80端口是否被占用
netstat -an |grep 80mac上启动nginx
由于使用homebrew安装openResty
xuxinghua@xxhdemac/usr/local/Cellar/openresty/1.15.8.1/nginx/sbin sudo ./nginx前端资源的部署
更改文件读写权限
sudo chmod 777 需要写入的文件名例子:
需要将 ~/java/项目/秒杀/Java电商秒杀系统深度优化 从容应对亿级流量挑战/源码/第四章.分布式扩展/htmlStable目录下的前端资源传输到202.117.35.221服务器上
scp -r * hpms@202.117.35.221:/usr/local/openresty/nginx/html出现错误:
scp 文件 : /目录: Permission denied 解决方法:
进入/usr/local/openresty/nginx赋予html文件夹权限
sudo chmod 777 html将当前目录下的所有文件及子目录的文件拥有者权限设置为读、写、可执行,文件拥有者所在的用户组成员具备读、写、可执行权限,其它用户也具备读、写、可执行权限
nginx.config文件
#user  nobody;
worker_processes  1;#1个工作进程

#error_log  logs/error.log;
#error_log  logs/error.log  notice;
#error_log  logs/error.log  info;

#pid        logs/nginx.pid;


events {
    worker_connections  1024;#可以接受工作连接1024个
}


http {
    include       mime.types;
    default_type  application/octet-stream;

    #log_format  main  '$remote_addr - $remote_user [$time_local] "$request" '
    #                  '$status $body_bytes_sent "$http_referer" '
    #                  '"$http_user_agent" "$http_x_forwarded_for"';

    #access_log  logs/access.log  main;

    sendfile        on;
    #tcp_nopush     on;

    #keepalive_timeout  0;
    keepalive_timeout  65;#http请求的客户端和nginx服务端连接timeout

    #gzip  on;

    server {
        listen       80;#服务端口
        server_name  localhost;

        #charset koi8-r;

        #access_log  logs/host.access.log  main;

        location /

        # pass the PHP scripts to FastCGI server listening on 127.0.0.1:9000
        #
        #location ~ \.php$ {
        #    root           html;
        #    fastcgi_pass   127.0.0.1:9000;
        #    fastcgi_index  index.php;
        #    fastcgi_param  SCRIPT_FILENAME  /scripts$fastcgi_script_name;
        #    include        fastcgi_params;
        #}

        # deny access to .htaccess files, if Apache's document root
        # concurs with nginx's one
        #
        #location ~ /\.ht {
        #    deny  all;
        #}
    }


    # another virtual host using mix of IP-, name-, and port-based configuration
    #
    #server {
    #    listen       8000;
    #    listen       somename:8080;
    #    server_name  somename  alias  another.alias;

    #    location / {
    #        root   html;
    #        index  index.html index.htm;
    #    }
    #}


    # HTTPS server
    #
    #server {
    #    listen       443 ssl;
    #    server_name  localhost;

    #    ssl_certificate      cert.pem;
    #    ssl_certificate_key  cert.key;

    #    ssl_session_cache    shared:SSL:1m;
    #    ssl_session_timeout  5m;

    #    ssl_ciphers  HIGH:!aNULL:!MD5;
    #    ssl_prefer_server_ciphers  on;

    #    location / {
    #        root   html;
    #        index  index.html index.htm;
    #    }
    #}

}
使用openresty登录前端
比如访问login.html页面
在浏览器上输入:
http://202.117.35.221:80/login.html
nginx.config中设置的root是html
所以在地址后面加上html目录下的html文件名,openresty会直接映射到服务端/usr/local/openresty/nginx/html目录下,找相应的html文件
前端资源路由
1 修改nginx.config
location /resources/ {
            alias /usr/local/openresty/nginx/html/resources/;
            index  index.html index.htm;
        }
2 转移前端资源到resources目录下
将/usr/local/openresty/nginx/html/目录下的文件转移到/usr/local/openresty/nginx/html/resources/目录下:
转移前html目录下:
-rw-r--r-- 1 root root  541  6月 17 10:13 50x.html
-rwxr-xr-x 1 hpms hpms 3093  6月 18 11:17 createitem.html*
-rwxr-xr-x 1 hpms hpms   36  6月 18 11:22 gethost.js*
-rwxr-xr-x 1 hpms hpms 5185  6月 18 11:17 getitem.html*
-rwxr-xr-x 1 hpms hpms 1880  6月 18 11:17 getotp.html*
-rw-r--r-- 1 root root  649  6月 17 10:13 index.html
-rwxr-xr-x 1 hpms hpms 1976  6月 18 11:17 listitem.html*
-rwxr-xr-x 1 hpms hpms 2354  6月 18 11:17 login.html*
-rwxr-xr-x 1 hpms hpms 3496  6月 18 11:17 register.html*
drwxr-xr-x 8 hpms hpms 4096  6月 18 11:18 static/
使用mv命令
hpms@hpms-1:/usr/local/openresty/nginx$ mkdir resources
hpms@hpms-1:/usr/local/openresty/nginx$ mv *.html resources/
hpms@hpms-1:/usr/local/openresty/nginx$ mv gethost.js resources/
#转移static/目录
hpms@hpms-1:/usr/local/openresty/nginx$ mv static resources/
3 无缝重启nginx
hpms@hpms-1:/usr/local/openresty/nginx$ sbin/nginx -s reload使用nginx作为动静分离服务器
location节点path热定resources:静态资源路径
location节点其他路径:动态资源用
修改nginx.config中
静态请求
设置了静态资源访问路径:
即当服务器发来的url:nginx服务器的IP地址/resources/,比如115.154.255.245/resources/ ,nginx会访问./nginx/html/resources/下的静态页面
location /resources/ {
            alias /usr/local/openresty/nginx/html/resources/;
            index  index.html index.htm;
        }
动态请求
location / {
proxy_pass http://backend_server;
proxy_set_header Host &http_host:8090;
proxy_set_header X-Real-IP $remote_addr;
proxy_set_header X-Forwarded-For $proxy_add_x_forwarded_for;
}当从用户浏览器传来的URL:nginx服务器的IP地址/,如115.154.255.245/user/get?id=6,会把请求分发到后端部署了miaosha.jar的服务器上处理
使用nginx作为反向代理服务器
设置upstream server
视频上:
upstream backend_server{
server 202.117.35.220 weight=1;
server 202.117.35.221 weight=1;
}
跟着视频上的步骤行不通,于是上网查了资料,很纳闷,逻辑都正确,弄了一下午的时间
最后终于正确了。
正确的:
upstream backend_server{
     server 202.117.35.220:8090 weight=1;
     server 202.117.35.221:8090 weight=1;
}
设置动态请求location为proxy pass路径
视频上:
location / {
proxy_pass http://backend_server;
proxy_set_header Host $http_host:$proxy_port;
proxy_set_header X-Real-IP $remote_addr;
proxy_set_header X-Forwarded-For $proxy_add_x_forwarded_for;
}
正确的
location / {
proxy_pass http://backend_server;
proxy_set_header Host $host;
proxy_set_header X-Real-IP $remote_addr;
proxy_set_header X-Forwarded-For $proxy_add_x_forwarded_for;
}
血的教训
以后配环境一定要看清楚符号
比如正确的应该是$host是$,而我打成了&host,郁闷了,整了一个下午。
error.log里面显示的端口一直是默认的:80
开启Tomcat access log 验证
application.properties中修改
server.tomcat.accesslog.enabled=true
server.tomcat.accesslog.directory=/home/hpms/xxh009/miaosha/tomcat
server.tomcat.accesslog.pattern=%h %l %u %t "%r" %s %b %D
%h:远端host,ip地址
%l:--
%u:remote user
%t:处理时长
"%r":对应http请求的第一行
%s:http返回状态码
%b:请求response的大小
%D:处理请求的时长创建好后,/home/hpms/xxh009/miaosha/tomcat目录下会产生log文件,比如access_log.2019-06-18.log
当有请求来时,/home/hpms/xxh009/miaosha/tomcat/access_log.2019-06-18.log文件内会出现:
115.154.255.245 - - [18/Jun/2019:21:35:22 +0800] "GET /item/get?id=6 HTTP/1.0" 200 316 732115.154.255.245:host 其实就是反向代理发过来的
%l:--
"%r":"GET /item/get?id=6 HTTP/1.0"
状态码:200
发送了316个字节
使用了732ms负载均衡配置
设置weight=1,nginx会轮询2个ip地址上的miaosha.jar服务
upstream backend_server{
     server 202.117.35.220:8090 weight=1;
     server 202.117.35.221:8090 weight=1;
}
分布式扩展后性能压测
nginx和miaosha.jar服务器之间默认的是短连接,可以开启nginx的keepalive模式,进一步提升性能
nginx和upstream后端服务器建立keep-alive长连接
目的
使用长连接解决分布式扩展后nginx服务器和upstream后端服务器网络建联的消耗
为什么nginx和后端服务器upstream默认是短连接呢?
那是因为nginx和后端服务器默认使用的是HTTP1.0的协议,默认的HTTP1.0协议默认是不支持keepalive的,需要默认设置connection:keep-alive.
我们设置反向代理层往后端服务器发送使用HTTP1.1的协议
location / {
proxy_pass http://backend_server;
proxy_set_header Host $host;
proxy_set_header X-Real-IP $remote_addr;
proxy_set_header X-Forwarded-For $proxy_add_x_forwarded_for;
proxy_http_version 1.1;

proxy_set_header Connection "";
}
后端服务器和数据库
使用miaoshaserver自带的Druid数据库的连接池解决了跟数据源之间的建联消耗
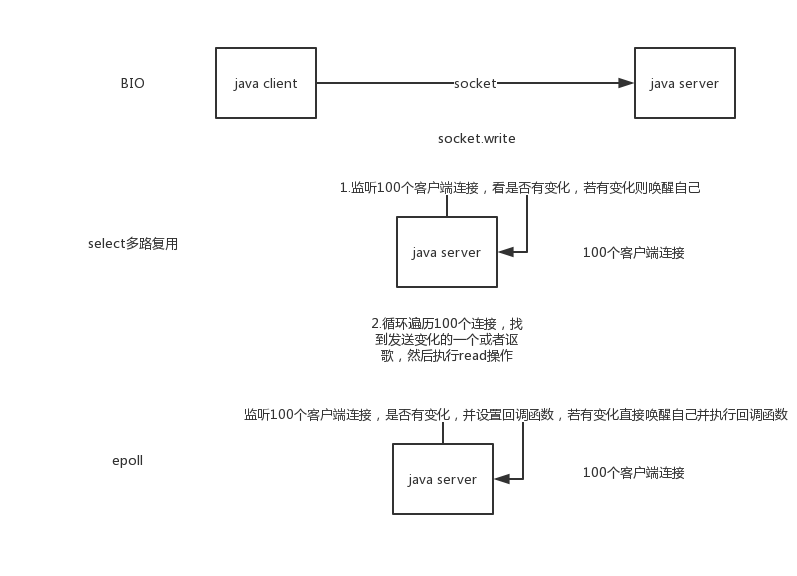
nginx高性能原因
epoll多路复用
java BIO模型:阻塞进程式
linux select模型,变更触发轮询查找,有1024数量上限
epoll模型,变更触发回调直接读取,理论上没有上限
master-worker进程模型
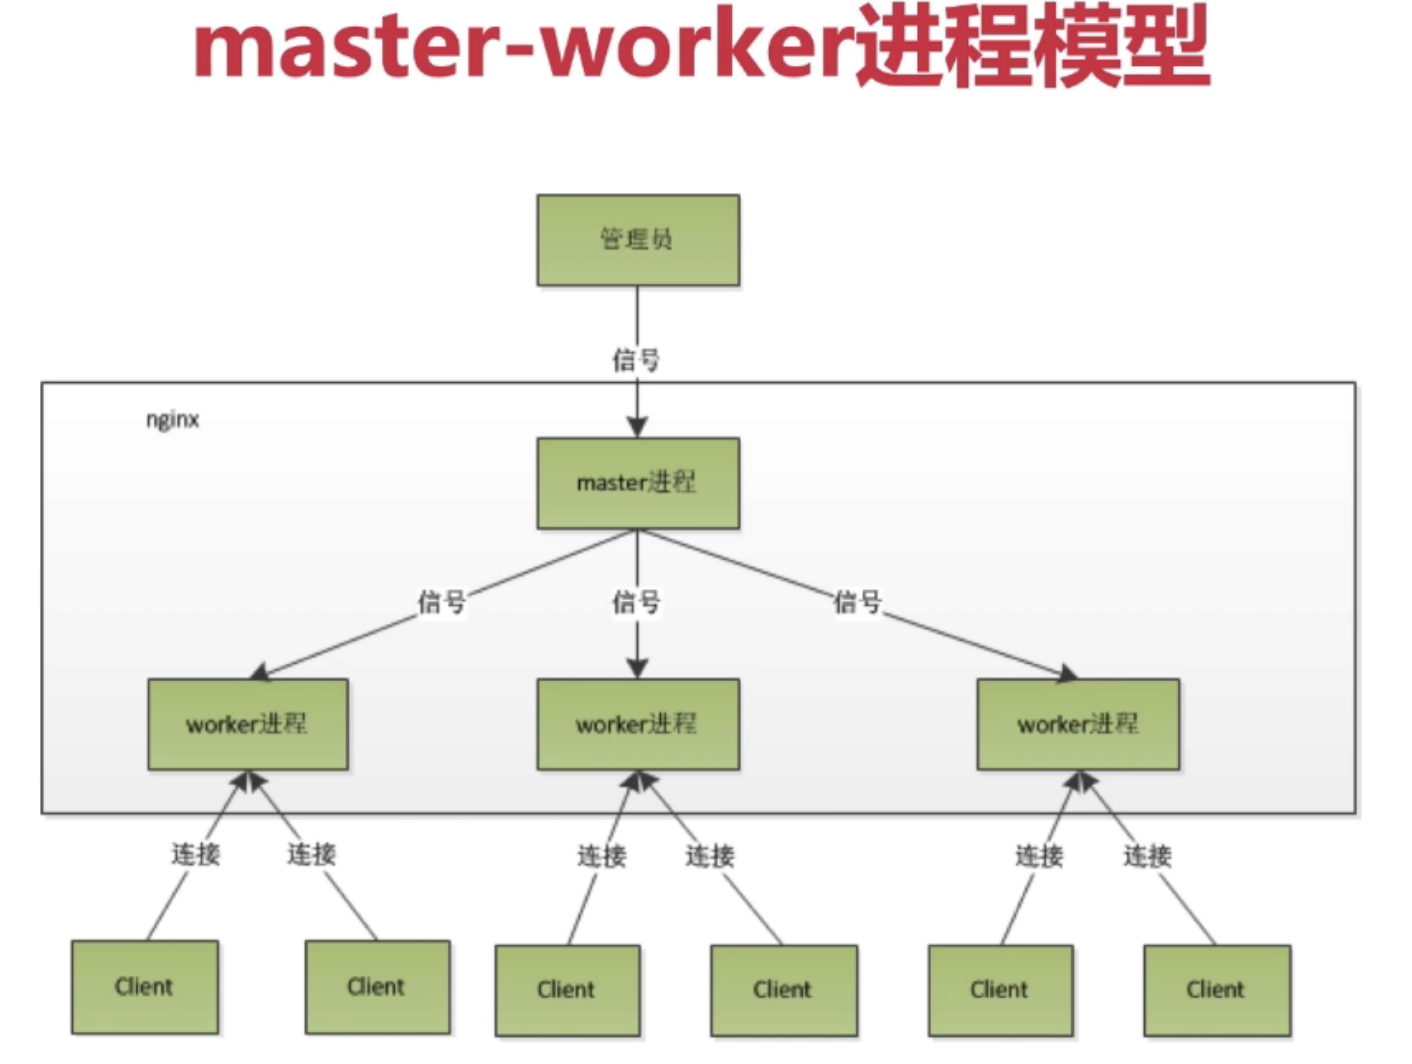
图形介绍
管理员:可以理解为root操作用户,用于启动和管理nginx进程
信号:启动nginx,sbin/nginx -c conf/nginx.conf
master根据nignx.congif中的worker_processes 1;fork出worker进程,它们主子进程的关系
work进程才是真正处理和客户端连接的
平滑重启
sbin/nginx -s reload一般修改完配置文件,重启服务都会断开原本和socket的连接,也就是断开服务
重启nginx
 xuxinghua@xxhdemac/usr/local/Cellar/openresty/1.15.8.1/nginx/sbin ps -ef|grep nginx
    0 22467     1   0  8:58PM ??         0:00.05 nginx: master process ./nginx
   -2 23614 22467   0 12:48PM ??         0:21.92 nginx: worker process
  501 24958 23250   0  4:08PM ttys001    0:00.00 grep --color=auto --exclude-dir=.bzr --exclude-dir=CVS --exclude-dir=.git --exclude-dir=.hg --exclude-dir=.svn nginx
 xuxinghua@xxhdemac/usr/local/Cellar/openresty/1.15.8.1/nginx/sbin sudo ./nginx -s reload
Password:
 xuxinghua@xxhdemac/usr/local/Cellar/openresty/1.15.8.1/nginx/sbin ps -ef|grep nginx
    0 22467     1   0  8:58PM ??         0:00.06 nginx: master process ./nginx
   -2 24971 22467   0  4:08PM ??         0:00.00 nginx: worker process
501 24981 23250 0 4:08PM ttys001 0:00.00 grep --color=auto --exclude-dir=.bzr --exclude-dir=CVS --exclude-dir=.git --exclude-dir=.hg --exclude-dir=.svn nginx可以看到,master process进程号2次都没变,都是22467,而worker process一次是23614,一次是24971
补充:
每个worker process中都是单线程,执行没有阻塞的任务
协程机制
比线程更小的内存模型,一个线程可以有多个协程;没有线程CPU的切换开销,只有内存的切换开销
- 依附于线程的内存模型,切换开销小
- 遇阻塞及归还执行权,代码同步
- 无需加锁
分布式会话管理
会话管理
基于cookie传输sessionid:java tomcat容器session实现
基于token传输类似sessionid:java代码session实现
基于cookie传输sessionid
目前实现的秒杀是通过cookie传输sessionid的,springboot中的Tomcat帮我师兄了session
比如:在浏览器上输入 http://localhost/user/get?id=23 对应的请求头 Request Header中会有cookie
Accept: text/html,application/xhtml+xml,application/xml;q=0.9,image/webp,image/apng,*/*;q=0.8,application/signed-exchange;v=b3
Accept-Encoding: gzip, deflate, br
Accept-Language: zh-CN,zh;q=0.9,en;q=0.8
Cache-Control: max-age=0
Connection: keep-alive
Cookie: Hm_lvt_512065947708a980c982b4401d14c2f5=1551084094; JSESSIONID=3C16C7B4DB293A1F56D3EB3C8A3FFACD
Host: localhost
Upgrade-Insecure-Requests: 1
User-Agent: Mozilla/5.0 (Macintosh; Intel Mac OS X 10_13_4) AppleWebKit/537.36 (KHTML, like Gecko) Chrome/74.0.3729.169 Safari/537.36
JSESSIONID其实就是Tomcat返回的内置cookie的标识,JSESSIONID对应到Tomcat内就是来获取对应用户的session的
基于token传输类似sessionid
移动手机端常用
分布式会话
会话管理出现的问题分析
基于分布式会话,上面基于cookie传输sessionid和基于token传输类似sessionid都是不能生效的。
来看看部署结构图:
因为上述两种策略都是在;单机的内存当中,
基于cookie传输sessionid:基于的是Springboot内嵌的Tomcat容器实现的,是居于内存,只在单机上起作用
基于token传输类似sessionid:基于java代码的,也是在内存里,只在单机上起作用
那么问题来了,如果一个用户登录请求通过nginx转发到了第一个miaosha.jar的服务器上,该服务器的sessionid存于内存中,当用户再发送一个其他请求,nginx把请求路由到第二个miaosha.jar的服务器上,由于2个服务器sessionid都在内存中,不能共享,所以会出现问题。
实践
1.用户登录
http://localhost/resources/login.html2.到商品详情页下单
http://localhost/resources/listitem.html3.下单
提示:下单失败,原因为用户还未登陆,不能下单使用redis解决分布式session管理
- 基于cookie传输sessionid:java Tomcat容器session实现迁移到redis
- 基于token传输类似sessionid:java代码session实现迁移到redis
1 基于cookie传输sessionid
引入依赖
<dependency>
      <groupId>org.springframework.boot</groupId>
      <artifactId>spring-boot-starter-data-redis</artifactId>
    </dependency>
    <dependency>
      <groupId>org.springframework.session</groupId>
      <artifactId>spring-session-data-redis</artifactId>
      <version>2.0.5.RELEASE</version>
    </dependency>
修改application.properties
#配置Springboot对redis的依赖
spring.redis.host=202.117.35.220
spring.redis.port=6379
#默认有16个database,可以用 select 10 来切换databases
spring.redis.database=10

#设置jedis连接池
spring.redis.jedis.pool.max-active=50
spring.redis.jedis.pool.min-idle=20
序列化错误
org.springframework.data.redis.serializer.SerializationException: Cannot serialize; nested exception is org.springframework.core.serializer.support.SerializationFailedException: Failed to serialize object using DefaultSerializer; nested exception is java.lang.IllegalArgumentException: DefaultSerializer requires a Serializable payload but received an object of type [com.imooc.miaoshaproject.service.model.UserModel]
原因:UserModel类没有序列化
解决方法1:
public class UserModel implements Serializable解决方法2:更好的方案
修改redis默认的序列化方式,改成使用JSON的序列化方式,这是跨系统当中最最好的。
登录验证
登录成功后,spring.redis.host=202.117.35.220上的redis-server会存有session信息
202.117.35.220:6379> SELECT 10
202.117.35.220:6379[10]> KEYS *
1) "spring:session:sessions:expires:2b321bc8-141a-402b-8545-d6d034b58cca"
2) "spring:session:sessions:2b321bc8-141a-402b-8545-d6d034b58cca"
3) "spring:session:expirations:1560949920000"
注意:
这里有个小插曲,因为application.properties中spring.redis.database=10
因为默认的database=0,所以要先select下
2 基于token传输类似sessionid
更符合现代互联网,不光支持电脑,还支持手机等各种移动端。
代码
UserController:
//用户登陆接口
    @RequestMapping(value = "/login",method = {RequestMethod.POST},consumes={CONTENT_TYPE_FORMED})
    @ResponseBody
    public CommonReturnType login(@RequestParam(name="telphone")String telphone,
                                  @RequestParam(name="password")String password) throws BusinessException, UnsupportedEncodingException, NoSuchAlgorithmException {

        //入参校验
        if(org.apache.commons.lang3.StringUtils.isEmpty(telphone)||
                StringUtils.isEmpty(password)){
            throw new BusinessException(EmBusinessError.PARAMETER_VALIDATION_ERROR);
        }

        //用户登陆服务,用来校验用户登陆是否合法
        UserModel userModel = userService.validateLogin(telphone,this.EncodeByMd5(password));//传入的encrptPassword是MD5加密后的

        //方法2:基于token传输类似sessionid

        //修改成若用户登录验证成功,将对应的登录信息和登录凭证一起存入redis中
        //生成登录凭证token,采用UUID,保证唯一性
        String uuidToken=UUID.randomUUID().toString();
        uuidToken=uuidToken.replace("-","");
        //建立token和用户登录状态之间的联系
        redisTemplate.opsForValue().set(uuidToken,userModel);
        //设置超时时间,一小时
        redisTemplate.expire(uuidToken,1, TimeUnit.HOURS);

        //下发token
        return CommonReturnType.create(uuidToken);
    }
OrderController:
//封装下单请求
    @RequestMapping(value = "/createorder",method = {RequestMethod.POST},consumes={CONTENT_TYPE_FORMED})
    @ResponseBody
    public CommonReturnType createOrder(@RequestParam(name="itemId")Integer itemId,
                                        @RequestParam(name="amount")Integer amount,
                                        @RequestParam(name="promoId",required = false)Integer promoId) throws BusinessException {

        //Boolean isLogin = (Boolean) httpServletRequest.getSession().getAttribute("IS_LOGIN");

        //为什么要getParameterMap(),因为前端getitem.html中传来的url:"http://"+g_host+"/order/createorder?token="+token,
        String token =httpServletRequest.getParameterMap().get("token")[0];
        if (StringUtils.isEmpty(token)){
            throw new BusinessException(EmBusinessError.USER_NOT_LOGIN,"用户还未登陆,不能下单");
        }
        //获取用户的登陆信息
        UserModel userModel= (UserModel) redisTemplate.opsForValue().get(token);
        if (userModel==null){
            throw new BusinessException(EmBusinessError.USER_NOT_LOGIN,"token不存在");
        }


        OrderModel orderModel = orderService.createOrder(userModel.getId(),itemId,promoId,amount);

        return CommonReturnType.create(null);
    }